Thursday, October 31, 2013

October Cat of the Month

source: http://jazzedaboutstuff.files.wordpress.com/2012/01/the-obsession-with-cats.jpg

Enjoy this beautiful face and those beautiful expressive eyes. What more does a girl need than a partner in crime, nap buddy, bed warmer, snack sharer, sassy roommate cat?

Thoughtfully yours,

Addie
The perpetual cat-lover

Read: if you don't like cats, take your negativity elsewhere. 

October Favourites

source: https://blogger.googleusercontent.com/img/b/R29vZ2xl/AVvXsEgpGNXJ4y4JP8U6CgBWrmKZfdCwyX1Eil0eKQks98n4UwLwPDgIdsPuKRvvhTRKAIb6292XGtUyito7TbRnPWxur-tNE4PYFogkF8oaIciJ1V80g-8LoBb-lc1LvdLQXZpKk2Yyf2egJTeY/s640/goodbye+october.jpg
And we are into NOVEMBER... to me that means CHRISTMAS TIME.  October went by super quickly, but I also learned and experienced many things (one being starting this blog!) 

I thought that I'd share with you a few of my favourites this month and why!


Skincare: Coola Face SPF 30 Cucumber Matte Finish Organic Sunscreen
source: http://www.coolasuncare.com/image/cache/data/2013_Product_images/2013_mineralproducts_cucumber_matte-450x530.jpg
I love love love love love this sunscreen.  I put it on every morning and it does NOT break me out.  I learned about this from Michelle Phan's video about sunscreen earlier on this summer and shelled out the big bucks to try something new.  Its $36.00 USD and TSA friendly sizing so it's great to bring with you on a trip.  It is so important for us to put on sunscreen (trust me I used to refuse doing it) to prevent the long term damage on our skin and also to prevent skin cancer.

The downside with this product is that I can only find it online and I have to pay for shipping which is quite a hefty amount as always.  I am looking for a new sunscreen for my sensitive, combination, acne-prone skin so that I don't have to always buy it online, but this is definitely one of my favourites!  (Let me know in the comments below if you know any good sunscreens for my skin and I will definitely try it out, or email me at 18.9teen@gmail.com)

Makeup: Laura Mercier Tinted Moisturizer in Sand
source: http://www.sephora.com/productimages/sku/s1150770-main-hero.jpg
Being the twentysomething I am, I started to look to get into a daily make up routine.  So the obvious thing for me to do was to hit up the local Sephora (okay, it was an excuse to spend more money on makeup, but it was fun!).  If you haven't tried it yet you should definitely try to get your skin colour matched by their 'Skin-IQ' process.  They basically take 3 pictures of your skin to give you a colour that is matched to the panatone system.  Then they put it into the computer and voila, your perfect shade.

As we were heading into the cooler months, I wanted something that I could wear everyday that is moisturizing enough but also just enough to make me look like me but better.  I have some redness and some acne, as well as scarring.  I also hoped to have something light.  I found this to be the perfect 'foundation' for me for an everyday look.  

It's super easy and simple and I now use it as my everyday routine.  My skin no longer feels chapped agains the cold harsh fall winds!

Book: City of Bones


source: http://upload.wikimedia.org/wikipedia/en/0/0f/City_of_Bones.jpg
This school year I started making sure that I read one book non-school related book each month.  No, this isn't the book this month it was for September but I am falling behind so I will tell you that this was my favourite instead.  I am reading City of Ashes this month but I may have cheated so I finished City of Bones the 2nd of October.  BUT I will definitely get through the rest of City of Ashes BY NOVEMBER 1st (okay, maybe 2nd)

Clothing Item: Lululemon Vinyasa Scarf in Slalom Stripe Pretty Pink
source: http://images.lululemon.com/is/image/lululemon/LW9901S_011749_5?$pdp_main$
If you haven't checked it out already, please check out the ways I styled the BEAUTIFUL Vinyasa Scarf here.  This scarf is amazing! It feels like a blanket and maybe I use it as one sometimes.  I love how you can be super creative with it and at the same time even if you are doing the typical double loop it is SO SO SO cozy.  

I might have even gone back to buy another one (it is actually one that they had left in the store from the season earlier it has solid black on one side and black stripes on the other) because I loved it SO much.

Quote: "Sleep Solves Everything"
source: http://media-cache-ak0.pinimg.com/736x/c9/27/11/c927114dfc5b59395135e623c7ff0cfc.jpgl
Okay, so I saw this quote on pinterest. And I LOVE IT.

But in all honesty, unfortunately sleep does not solve everything.  I HAD THE WORST MONDAY EVER DUE TO EXCESSIVE SLEEP.

But that is besides the point.

Food: Almond Fresh Original Almond Milk
source: http://www.almond-fresh.com/images/stories/ProductsPage/original_nftprodshot-2013.png
So maybe it isn't a food, but more so a beverage. BUT I LOVE THIS.  It is 'refreshing and nutty' all at the same time.  I drink it straight-up, but definitely try adding this to your coffee as a creamer or to your cereal!

Well that's it, I hope you enjoyed my favourites and I hope they become your NOVEMBER favourites or one of your many favourites in the future!

Let me know if you have any favourites or anything that I should try!!?

Thoughtfully yours,
C.C.

Wednesday, October 30, 2013

Quick Tips for Travel Photography

Hi ! I'm Kay, guest blogger on 18nineteen...twentysomething. I went to Vancouver with my boyfriend this past summer, and Addie and CC asked me to write a blog about how to take really great photos. I like to consider myself to be an amateur photographer because I've never really had any professional training, but it's something I LOVE to do. So here we go! Kay's photography tips:

source: http://images.teamsugar.com/files/users/1/15111/18_2007/fab_10_0.jpg

1. Protect your camera!
When you're in a foreign country, you will automatically look like a tourist. Think about it, big backpack, tour book in hand, camera around your neck. You're bound to stick out like a sore thumb! That makes you a target for thieves, because they know you'll be too distracted with looking around that you won't notice if they sneakily take your wallet or camera. SO first rule of thumb is to keep your camera either around your neck if you have a DSLR, or around your wrist if you have a point and shoot! 


source: https://blogger.googleusercontent.com/img/b/R29vZ2xl/AVvXsEgtMSOtn8uqAeLL7q6gL8KMCEeM_kuhR-cDLMvXoTar77hWyWWFqxx2TuPHzS7YeltpUH-09FkffyF2eLcWNuO-Y4ncOUXvCAka7_AjWVuQyp3GxuER5o7nw6XkFwDB3v2xv5Bpo2TxaiGh/s1600/camera.jpg

2. Keep your camera on you at ALL times!
You never know when you'll see something that you want to take a picture of. If you always keep your camera in your bag, then you'll be wasting time trying to find it, and the really cool thing you just saw may have just disappeared around the corner. You'll regret it later on, so don't do it!


source: http://upload.wikimedia.org/wikipedia/commons/a/ac/SDHC_memory_card_-_8GB.jpeg

3. Memory cards.
You will end up taking hundreds, if not thousands, of photos while on your trip. So it is very key to either have many memory cards, or to always save the photos on your laptop at the end of the day, and clear the memory card before you head out the next day. Buying memory cards with lots of storage is preferable. A 2GB card will only get you so far. Having at least 4GB is ideal. It is VERY important that you format your memory cards before you even start your trip. This will get rid of anything taking up space on your card, leaving more room for photos! To format the card, put it into your camera, go to the menu, and there should be a format option somewhere. 


source: http://www.psdgraphics.com/file/battery-energy-icon.jpg

4. CHARGE THE BATTERY EVERY NIGHT.
 Self-explanatory.


source: http://plazakamera.com/wp-content/uploads/2012/10/jual-gorilla-pods-03.jpg
5. Taking pictures with you in it.
It's nice to take pictures of your surroundings, but every so often you'll want to be in one of those pictures too. It's great to show your family and friends pictures with you in it when you get back home. Even if you're travelling with friends, you'll want to take some pictures with all of you in it at the same time, so here are some ways to take those pictures:

- ask someone else to take the picture. It's hard to trust anyone else with your camera, they could just take it and run. But just make sure you don't ask anyone who looks 'sketchy'. I know that's a bit judgemental, but you don't want to lose your camera in the middle of your trip. Try asking other tourists, particularly ones who also have a camera, because then they'll know how to use it. Tourists know that if they were in your shoes, they wouldn't want anyone taking their camera, so they're less likely to take yours. If there are no tourists around, try old people (although they may not know how to use a camera), and parents with children. ALSO, if someone else asks you to take a photo for them, ask them to take one of you after, they owe you a favour ;) 

- use the timer function on your camera. If you can find a nice flat surface to set your camera on, get your friend to stand where you want to take the photo while you adjust the angle of the camera. Set the timer up, 5 seconds should be enough. Run beside your friend and smile for the camera :) Just be aware that if you do leave your camera out there, it's more vulnerable to people running by a taking it, so check your surroundings before you take the photo.

- SELFIES. I know its not the best option, but sometimes you have to do what you have to do. If you're using a point a shoot, make sure you stand on the left of your friends when you take the photo, because they button is on the left. If you're using a DSLR then hold it with two hands to avoid dropping it. This may take a couple of shots, and you may end up cutting off some heads and arms, but it will work eventually haha. Note that if you are taking a selfie photo, you won't capture as much of the background as you'd like to!


source:  http://upload.wikimedia.org/wikipedia/commons/thumb/3/34/Macro_symbol.svg/354px-Macro_symbol.svg.png
6. Artistic photos.
It's hard to say how to take an 'artistic' photo. The key things are lighting, focus, and perspective:

- Make sure that you have good lighting. You don't want it to be so dark that you can't see anything, and you don't want it to be so bright that it overpowers the photo. It takes practice, but eventually you'll get it. Don't forget you can always edit the photo on your laptop after to adjust the exposure. 

- You don't want your photos to focus on the wrong things. One trick I use with point and shoot cameras is to put the thing you want to focus on in the middle of the frame first, hold the button down half way until it focuses, while keeping the button held halfway you can now adjust your camera and place the object where you want to, then push the button down the rest of the way to take the photo! When taking close-up photos, I like to use the macro mode (that's the mode with the flower symbol). It's great at making one thing in focus, and blurring out the rest of the background to make it look really professional.

- Be creative with the camera angles that you use. Straight on shots can be super boring. Try bending down lower and pointing your camera upward. Sometimes I even lie down on the ground (if it's clean enough) and take the shot from there. Experiment yourself with angles you like and don't be afraid to push the boundaries!

So those are all the tips I could think of! Just have fun with it and make sure you put the camera down every once in a while so you can take everything in with your own eyes :) 

Thoughtfully yours
Kay

Editors' note: Comment or like if you want to hear more from Kay. :)

Tuesday, October 29, 2013

Addie's Style Book: Airport Style

Airport Style


Travelling can be quite the hassle and can definitely take a toll on your look. For those long trips, my go-to style is low maintenance and chic. Here's an example of something I would wear for a long plane ride or any trip. 

The flats are comfortable and perfect for having to run to catch a plane or train. And if you'll be sitting for a while leggings are a great basic to have. Plus they're warm which is perfect for over air-conditioned planes! 

Wearing a cute camisole is an ideal way to dress up an otherwise low maintenance look so when you get to wherever you're going, you don't look too touristy! 

Also, remember to wear glasses so your eyes don't get too dry (particularly if you're not used to wearing contact lenses on planes), bring a large tote to fit all your travel essentials and wear your hair in an easy and put together style. Happy travelling!

Thoughtfully yours,

Addie


NIC ZOE cardigan
nicandzoe.com


Topshop black pants
topshop.com


Chanel ballet flat
vestiairecollective.com


'Ain't Nobody Got Time for Makeup' Makeup

So maybe sometimes poor decisions are made on Monday nights.  Especially when you have appointments in the day on the Tuesday.

I woke up this morning running a bit late and I looked exhausted (probably because I didn't get enough sleep). I didn't really want to put on a whole face of make up, not that my daily routine is super heavy anyway.

I quickly washed my face and moisturized.  Also, I made sure to apply sunscreen. Then I went to the 2 magical products I needed.

1) Undereye Concealer
source: http://demandware.edgesuite.net/sits_pod18/dw/image/v2/aaen_prd/on/demandware.static/Sites-armani_us-Site/Sites-gab-master-catalog/default/v1383079276238/Maestro%20Eraser%20Concealer%20-%20New%20Straub%20Image.JPG?sh=670
My personal favourite undereye concealer is from Giorgio Armani "Maestro Eraser". It's a bit of a splurge (a lot of a splurge) but I love it.  It blends in so naturally and so easily.  I've tried many different concealers, I tried using just BB cream as an undereye concealer too but this has got to be my favourite!

2) Brow Gel/Tint
source: http://www.benefitcosmetics.fr/medias/sys_master/8801262403614.jpg
My current favourite is Benefit's "Gimme Brow".  It recently won Allure's Best of Beauty award too!  It's great for my sparse brows because it fills it in, gives some colour and tames it.  Super quick and easy to use.

So that's it. The secret to a quick and easy make up (if it can even be considered that) for all of you that prefers to sleep in those extra 2 minutes :)

Let me know if there's anything else you'd like to see :)

Thoughtfully yours,
C.C.

Sunday, October 27, 2013

The Vinyasa Scarf

So I LOVE my Vinyasa Scarf.  I think I almost wear it everyday! I also bought another one in black (reversible so the other side is black and grey stripes!).  

While there are tons of videos to show you how to wear your Vinyasa scarf Addie and I picked out a few to try as well as used our 'creative' minds to think of a few looks to make.

1. Double Loop


2. Unbuckled Double Loop


3. Triangle Wrap


4. Simply a Scarf

5. Simply a Tucked Scarf

6. Easy Knot

7. Circle Knot


8. The Traveller

9. The Penguin Shrug

10. The Wrap Shirt

11. The Long-Sleeved Wrap Shirt


12. The Vest Cardigan

 14. The Long Sleeved Cardigan

Do you have any good ideas?  Did you want a tutorial?  Comment below! :)

Thoughtfully yours,
C.C.


Friday, October 25, 2013

Easy Eyes

Have you ever had those mornings where you have absolutely no time to put on any makeup? Or, you prefer that extra 10-15 minutes of sleep. 

source: http://blog.swagbucks.com/wp-content/uploads/2013/03/tumblr_mdjfiz4gcE1rqj5g7o1_500.jpg

I have very straight eyelashes that are also fine and sparsely spread across my lash line.  This look honestly takes me less than 2 minutes to complete.  

If you are looking for a very natural look just to enhance your natural beauty (because that's what make up should be for most of the time!), you might want to give this a try.

In this tutorial I used:
- a felt tip eyeliner (I used stila all day liquid eyeliner in black)
- an eyelash curler (I used my shu uemeura one)
- black mascara (I used dior iconic overcurl, it was what I had, I would suggest something that is waterproof if you really want a curl to hold because they normally contain wax)

To start off any make up look, you always want clean hands (and face that is moisturized).  If you need to feel free to prime your lids if they get super oily!

1. Using a q-tip or clean finger tips lightly lift the eyelid up so you can see your lashline and waterline.  Apply your eyeliner in between the gaps at your lashline (not your waterline).  This technique is called tight-lining.  I do that to about 1/3 of the way in (from the outer corner of my eye).  See the picture below to see what it looks like.  (Doesn't it look so natural?)


2. Curl your eyelashes with your favourite eyelash curler.  You want to try to find one that fits the shape of your eye.


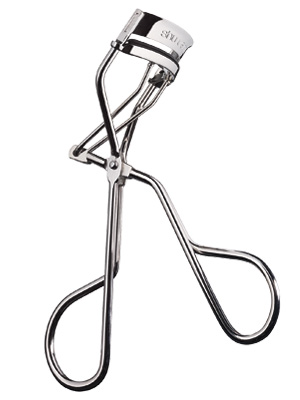
source: http://img2.timeinc.net/instyle/images/2010/bbb09/shu-uemura-eyelash-curler-300.jpg

3. Apply one coat of your favourite mascara.  A waterproof formula tends to hold curls best. I go from the base of my lashes all the way up.  Don't worry about getting it on your eyelids.  If that happens, wait for it to dry and grab a q-tip.  Rub gently with the q-tip to remove the dried mascara from your lids.

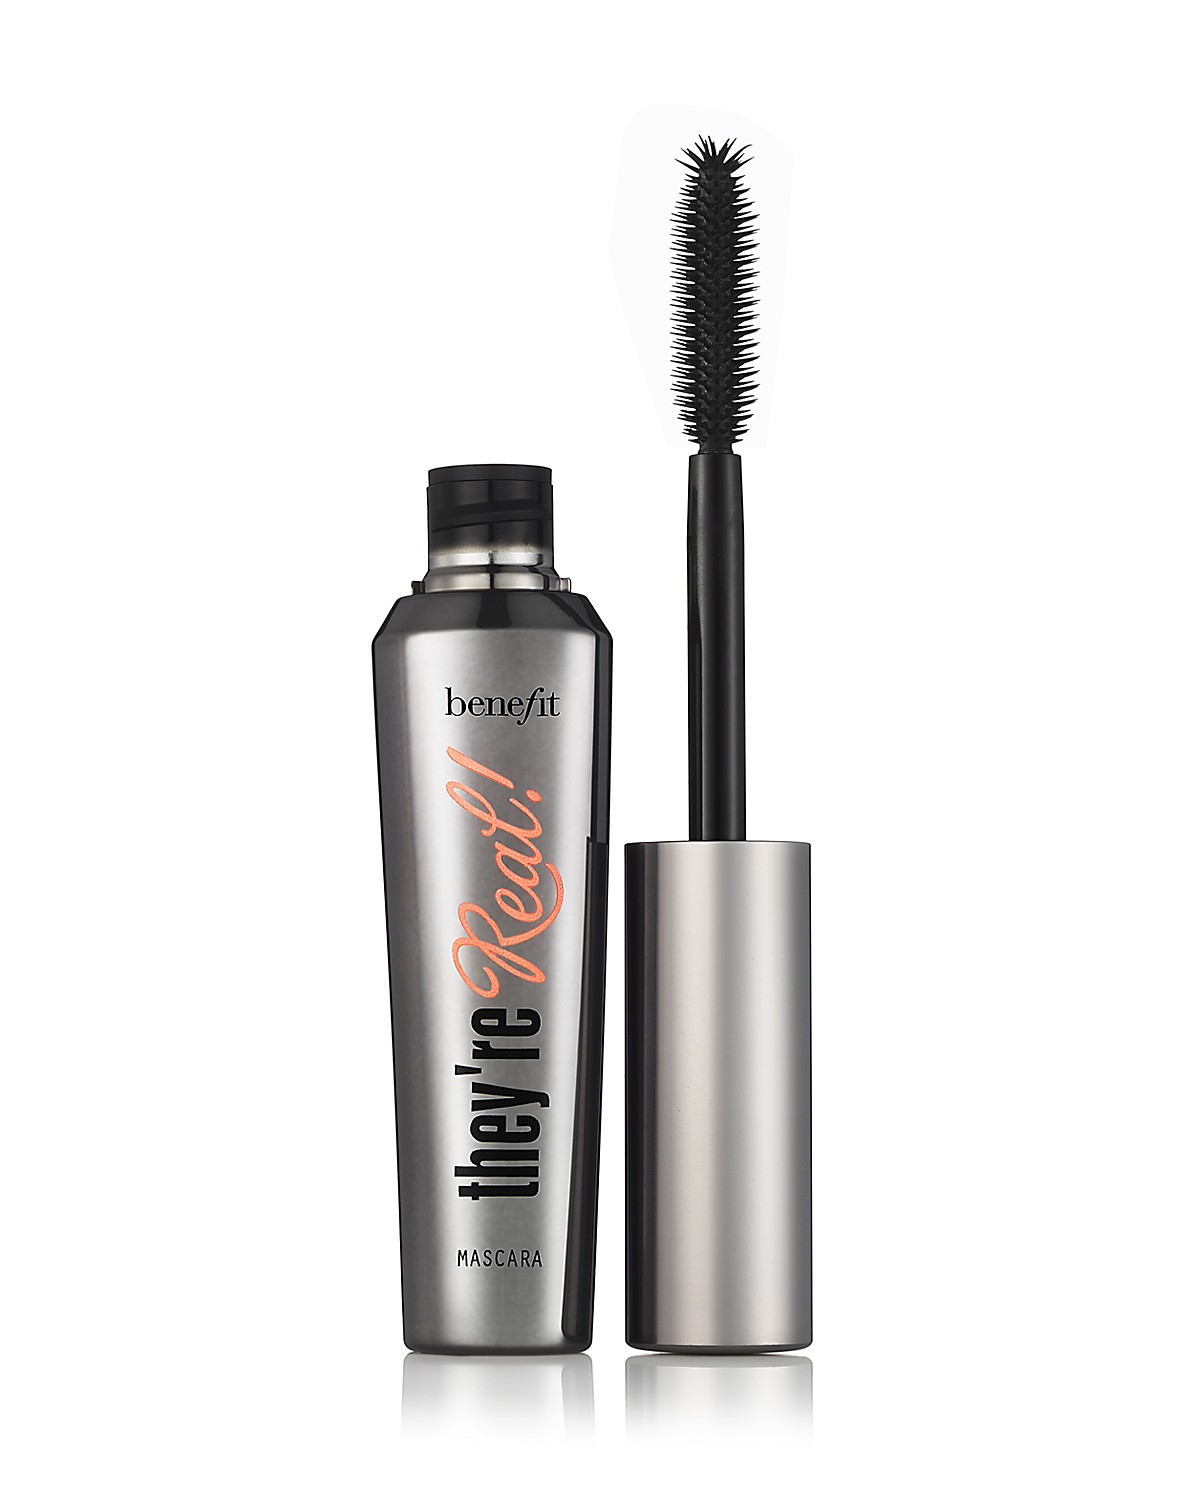
source: http://images.bloomingdales.com/is/image/BLM/products/8/optimized/1168958_fpx.tif?wid=1200&qlt=90,0&layer=comp&op_sharpen=0&resMode=sharp2&op_usm=0.7,1.0,0.5,0&fmt=jpeg

Tada! You're done and ready to head out the door :)


Please comment below if you have any other questions or requests :)

Thoughtfully yours,
C.C.

University Student Solutions: Sunday Dinner


Just because we're super busy and have exams doesn't mean we have to sacrifice good food. On Sunday, we made dinner together after a long week and preparing for another long week. Our dinner was quick to make and required very little clean up. 

What we used:
- Rice
- Avocado
- Cherry Tomatoes
- Fish (Technically we cheated because we bought frozen fish and cooked it in the microwave)
- Seaweed
- Olive oil
- Soy Sauce
- Salt and Pepper

Preparation:
1. Make rice. (Let us know if you'd like a tutorial on that! We know the secret finger trick!!!)
2. Prepare frozen fish according to the instructors. (when microwaving consider putting saran wrap over top the dish and make sure to leave a corner open so the hot air can go out, or consider getting a microwave cover)
3. Cut avocado and cherry tomatoes
4.  Add some soy sauce, olive oil, salt and pepper.
5. Bring out some nice salty seaweed.
6. Serve and enjoy.

Thoughtfully Yours,
Addie and C.C.


Thursday, October 24, 2013

Easy as 1.2.3.

Get a complete everyday makeup look with just 3 products! This was my makeup look our photoshoot. For C.C.'s makeup look, comment and we'll make sure to show you soon!

 Here are my 3 everyday essentials as seen in Addie's Style Book

1. Start with a clean, moisturised face. 
2. Apply an even layer of a light coverage foundation. I like Maybelline's Fit Me shade 120 foundation because it applies like a lotion and doesn't feel cakey like many foundations do. 
3. Line upper and lower lash line with a black or coal eyeliner. I used Physician's Formula eye liner. Stay close to the lash line to avoid looking unnatural.
4. Swipe a neutral lipstick to complete the look. I chose Rimmel Kate Moss lipstick in a matte finish, shade 17. 


Feel free to comment if you have any questions or for C.C.'s look :)

Thoughtfully yours,

Addie

20 Twenty-something Essentials


Being a twenty-something means growing up. Although you don't have to be a full adult, there are some essentials you will need. Here's our list...

1. post-its 


2. A good face wash (Invest in your skin)

3. Interview clothes

4. An organizer

5. A kettle

6. A good loofah


7. Cup(s) of tea

8. A quality bra

9. LBD (little black dress)

10. A reliable friend 

11. A cookbook or two

12. A grown-up email address

13. Tampons

14. White T-shirt

15. A savings account

16. A reliable water bottle (preferably one that can hold hot and cold drinks)

17. A nice tote bag


18. A simply, comfy pair of heels

19. Nice leggings

20. Health awareness (physical, mental etc.)


Thoughtfully yours,

Addie

sources: 
http://www.shespeaks.com/pages/img/review/U-by-Kotex-Register-Rewards-Deal_08292010175728.jpg
http://static.tumblr.com/5434033e88d852c7148cf2940887626a/4lcmunt/QKNmfqzgv/tumblr_static_loofah-a.jpg
http://api.ning.com/files/7l33hFydjUDdgQwAOGSyNly*rUmtyfhCUUMeWIqNgm4bGe3ayVv4B0N1HVx0YFXFElWIvJQ-wc577hlgN-db2DXVLqvdtQ4R/postitnotes1.jpg
http://www.shopaholicgeek.com/wp-content/uploads/2011/04/longchamp.jpg


Wednesday, October 23, 2013

University Student Solutions: Exam Essentials

source: http://storage.theinformationdaily.com/images/medium/202.jpg

As midterms are coming close to an end... that means Finals are right around the corner!

Here are a few essential items to make sure you pack to your exams.

1. HB Pencil (lead/pencil sharpener)


source: http://books.arc.losrios.edu/StoreImages/114-962240-1.jpg
Most exams I have written have required me to bring a pencil to fill in the bubbles for my scantron card.  Make sure it is HB.  If you are using a mechanical pencil, consider bringing an extra incase it breaks; don't forget to bring some lead as well.  If you are using the old school pencils, bring a pencil sharpener (and an extra as well!).

2. Eraser
source: http://somethingsarecool.com/wp-content/uploads/2013/08/Staedtler_Mars_Plastic_Eraser.jpg
How else would you be able to correct your answers on your scantron card?  Or you may not make mistakes, but no harm in bringing one just in case.  Try to find a eraser that works for you (removes marks completely).  Personally, I love my Staedtler one; it removes EVERYTHING.

3. Student Card/Photo Id
source: http://moresay.com/wp-content/uploads/2013/02/monsters-university-posters-student-id-cards-01.jpg
Don't forget to bring your student card or some sort of government issued photo identification so your proctors can verify who you are!  I've seen people get turned away from exam rooms because of it!

4. Water Bottle

source: http://cn1.kaboodle.com/hi/img/c/0/0/115/9/AAAADLJhUcsAAAAAARWXtw.jpg?v=1292355327000
I always bring a water bottle with me, especially if it is a long exam! I love my camelbak because it doesn't leak (not yet at least) and I can sip it like sipping a smoothie through a straw.  Sometimes the exam rooms are a bit dehydrating so... sip up! :)

5. Sweater

source: http://demandware.edgesuite.net/aacg_prd/on/demandware.static/Sites-RootsCA-Site/Sites-roots_master_catalog/default/v1382566188074/customers/c972/04030035/generated/04030035_008_a_475x475.jpg
Sometimes exam rooms are super chilly, especially in the summer.  In the winter, they get extremely hot.  This poses the biggest dilemma.  My advice? LAYERS.  Bring a sweater and wear a t-shirt.  If you are already a wearing a sweater and it gets too hot, at least you have something underneath that you can wear (e.g. not just your bra).  If you are wearing a t-shirt bring a sweater just in case it gets too cold.  I sometimes even double up, especially when the exam is written in a gym hall.

6. Other:


source: http://www.directeffectcharities.org/sitebuildercontent/sitebuilderpictures/backpack1.jpg

Some other items you may need to bring, dependent on what your professor may have told you in class.  They may include: calculators, pens, highlighters, rulers, pencil crayons, textbooks, dictionaries, ziplock bag, etc.  

Pro Tip: Pack your bag the night before so that you won't be in a rush when packing up your backpack to leave for your exam if you are running late! 

Also, don't forget to eat a nice healthy breakfast (check out Breakfast in 5 by Addie) before your exam so your brain has energy! 

With that, all the best.  Good luck. 

And may the odds be ever in your favour.
can't wait till Catching Fire comes out!


Thoughtfully yours,

C.C.